Prepare your SD card for use as HardDrive on Emu68
Quick Start
SD Card preparation can be a daunting task for a beginner or even an experienced Amiga user. For this reason a tool named Emu68 Imager was developed which will help you quickly prepare your SD Card to include a pre-installed Workbench 3.1, 3.9, 3.2 or 3.2.2.1 installation with Emu68 features like Wifi, P96 and also some other essential tools already installed. You can read all about it and download it at the following link:
https://mja65.github.io/Emu68-Imager/
However, if you would like to do this manually, please keep reading!
Foreword
Emu68 is a bare metal JIT translator of m68k binaries which attempts to emulate as little as possible. Therefore, it is not possible to attach a HDF image file to the system and let Emu68 pretend that this is a hard drive. Rather, Emu68 in PiStorm (and native AROS) variant has added a Zorro III card with a ROM containing a device driver for microSD interface of Raspberry Pi such that the microSD card can be used as a hard drive on your system.
The microSD card can be used as a hard drive on your system without any further actions required from your side. However, such solution is potentially dangerous - you have full access to the card, including modifying and/or destroying boot files and the Emu68 image itself. There is a safer way of doing things - instead of using the disk as a whole, you can define primary partitions (the SD card is set up with a MBR) of type 0x76 which will appear as separate hard drive units on your m68k operating system. This means regardless of what you do with these drives your boot partition will stay safe. You can even move them on the microSD card, or copy them using a dd tool to other cards or to a hardfile.
In this document I will guide you step by step from a freshly bought microSD card to an AmigaOS installed on it. This guide assumes that you have access to a Windows machine, but nearly the same steps can be performed on Linux or macOS. Also, keep in mind that the card has to use MBR partition layout. GPT is not yet supported by the SDHC driver of Emu68.
CM4 with eMMC
If you happen to be a user of ComputeModule 4 you might have noticed that these are sold in two options - with or without eMMC memory. This difference is very important for you and your journey with Emu68. In the case of the both the CM4 and Pi4B+, the microSD card is not connected to the SDHOST controller as it is for other models of the Raspberry Pi. Instead, the SDHC-compatible eMMC interface is used. As a consequence the eMMC/microSD media is accessed by brcm-emmc.deviceon these models. It also means that your CM4 can only use either eMMC or microSD - but not both. If you have bought a CM4 with eMMC memory, the eMMC interface will be physically wired to that memory and you will not be able to use microSD at all so choose wisely as to which you buy!
If you have the CM4 version with eMMC, you will need to put the ComputeModule into USB boot mode and start the RPi-boot utility (https://github.com/raspberrypi/usbboot). It will load small firmware to your CM4 and will change it to a mass storage device exposing the eMMC memory. Once this is done you may use it as if it was a microSD card plugged into your computer. However, you will not have the flexibility of being able to use a microSD card.
First steps
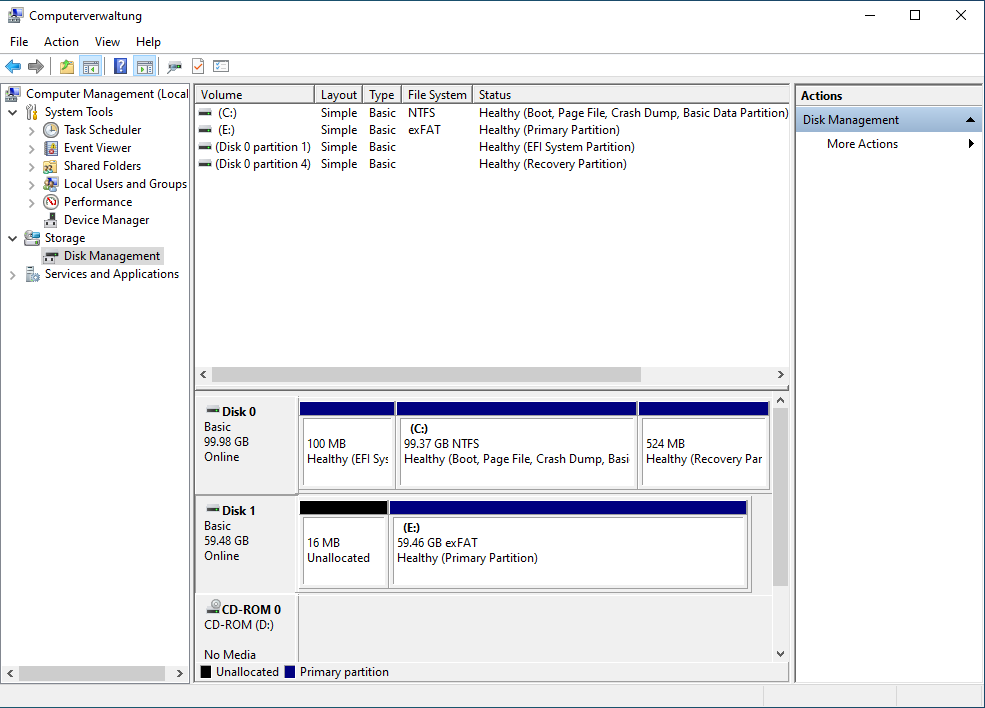
First open the Computer Management tool in Windows and proceed to the Disk Management tool. There, you need to identify the microSD card (which should already be inserted into the card reader). In the example shown below, the microSD card is visible as Disk 1.
Now, delete the volume (E: in my case) from the card as we do not need it anymore. Subsequently create a new simple volume (that will be a primary partition) there
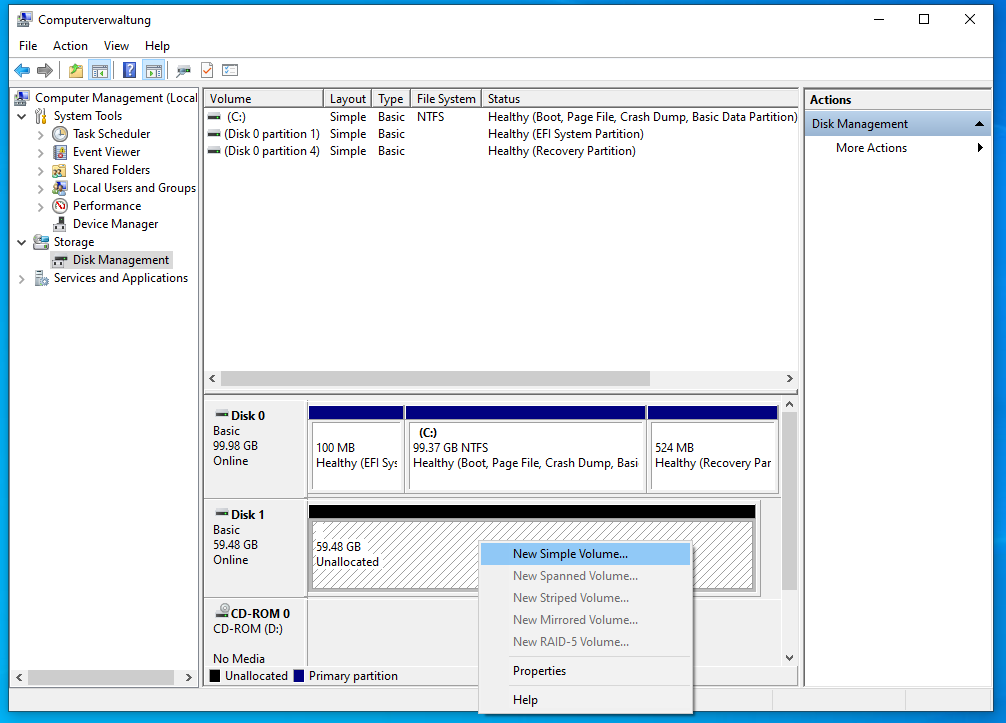
A new dialog window will appear asking you several questions. The first one is about the size of the volume. Set it to a small value, let’s say 200 MB which should be enough for everyone ;) Let Windows format it as a FAT32 partition and assign a drive letter to it as we will then copy the Emu68 files there later. Give this volume any name of your choice and complete the process. Now you have your boot partition on the SD card.
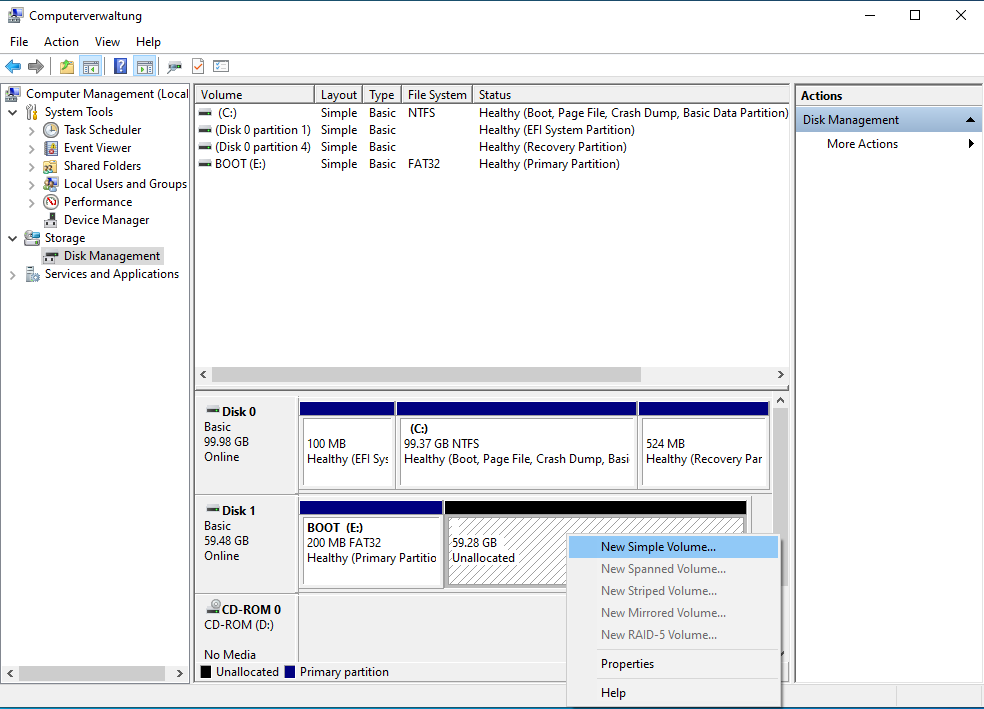
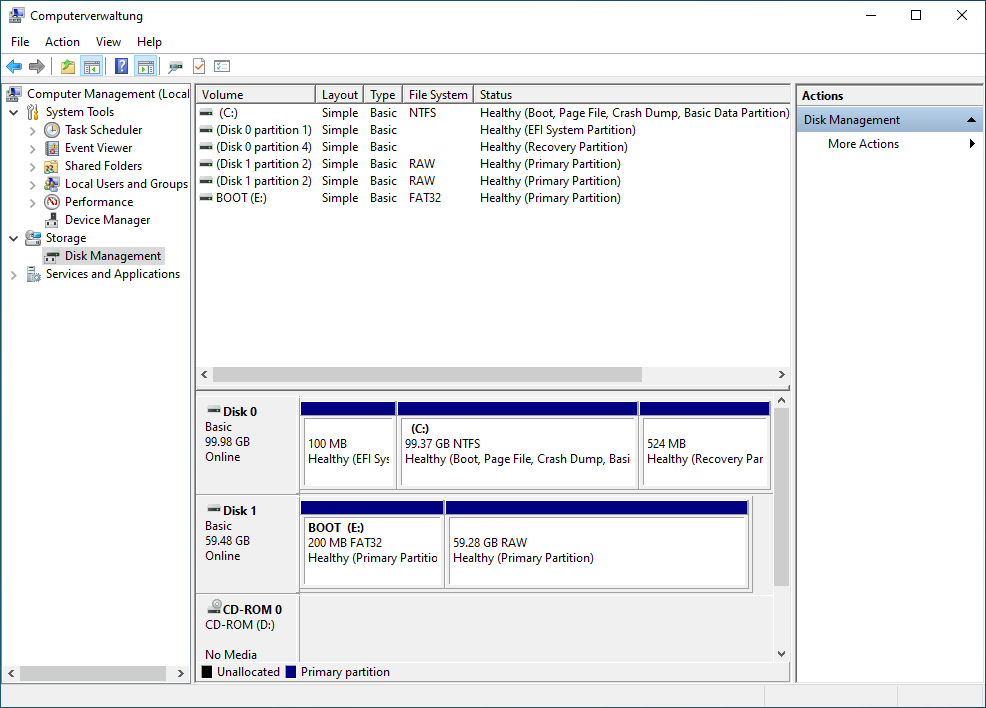
Now we will use the remaining space as a virtual drive for Emu68. In order to do that create a new simple volume there. In the dialog window do not assign a letter to that volume, otherwise Windows will prompt you to format it later. On some systems you will be forced to assign the drive letter - in that case do not initialise partition after it is created. Please select the option that Windows will not format the volume. Now you should have something like this, with our special partition marked as RAW:
Dangerous part
Now fasten your seat belts! If you are unfamiliar with Windows and make a mistake here (e.g. selecting the wrong disk), you may render your Windows environment unbootable. What we need to do is to change the partition type for the newly created RAW volume. It will be changed to a type 0x76 which is used by Emu68 (and WinUAE or Amithlon) to identify that the partition will be treated as a virtual hard drive by the Amiga.
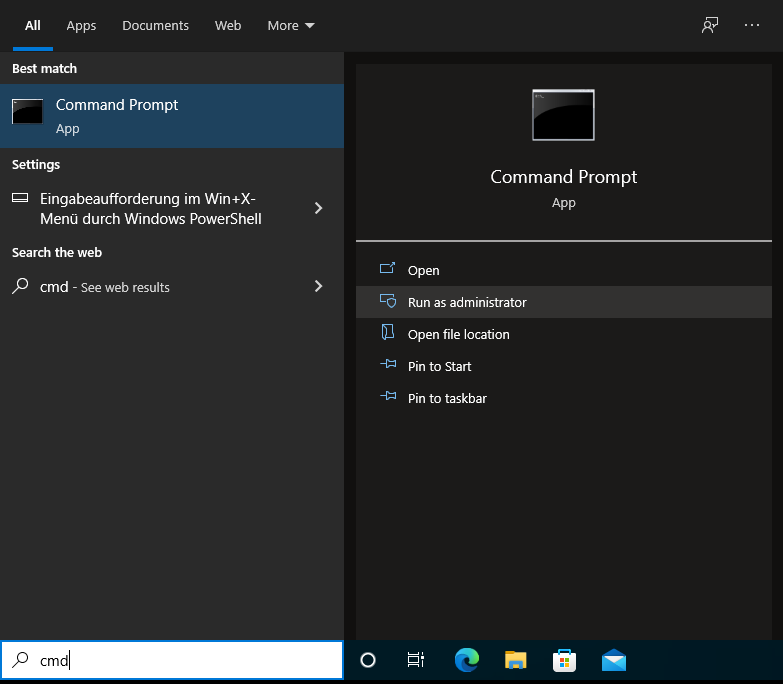
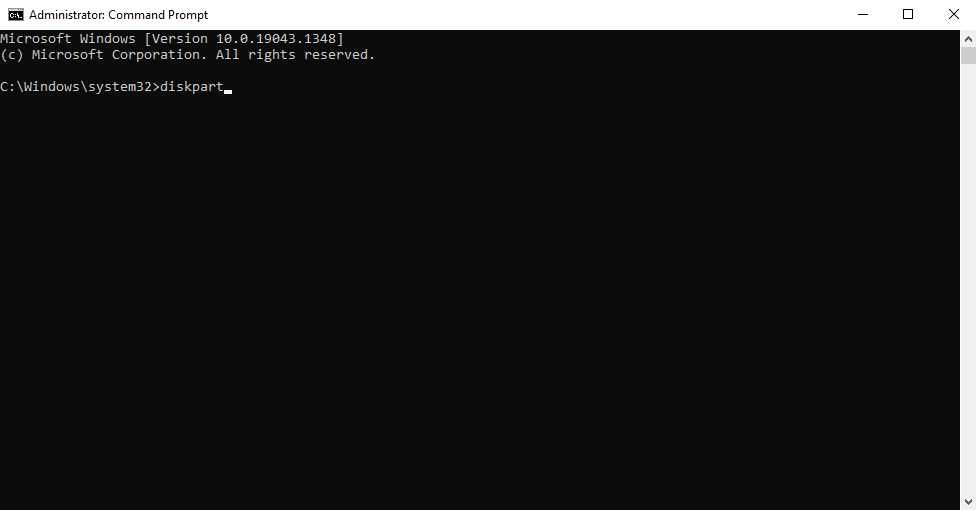
First, open a command prompt as Administrator
Then, start the diskpart tool - the allmighty disk partitioner!
You may remember from Computer Management, that my microSD card was called Disk 1 there. Now, let’s make sure diskpart agrees and list available disks
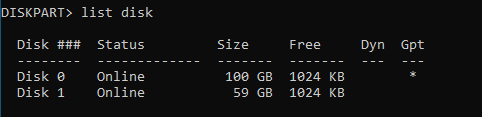
Here you go! Disk 1 is online, the size matches. In order to use diskpart the disk needs to be manually selected. When you start diskpart no disk is selected by default. We need to select our microSD card so that we can continue. It will be done using select command. Type
select disk 1
and press ENTER. Now we have selected the microSD card in diskpart, we need to repeat that step and select the relevant partition. Use the list command again, this time to display all the partitions of the selected disk
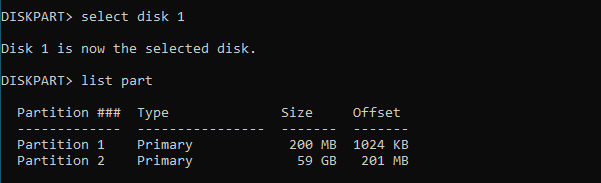
As you might guess by now, the partition 2 is the one which should be changed now. Select this partition by typing
select part 2
Finally, setting the type will be done with command set as following

Done! Now you know why this tool is so dangerous. It assumes that you really know what you are doing and it will apply the changes without asking for any confirmation! So, be warned and make sure you really know what you are doing!
Ok, I hope you have selected the correct disk and the correct partition! The dangerous part is over and diskpart can be closed. Type exit and press ENTER. You can also close the command line as it will not be needed anymore.
Copying Emu68 files
In order to bring Emu68 to life, the boot partition needs to be populated with Emu68 itself as well as Raspberry Pi firmware files. Please go to the Emu68 releases page on github (you can find it here: https://github.com/michalsc/Emu68/releases) and locate either the most recent Emu68 release for your PiStorm model or, if you prefer living on the edge, the most recent Emu68 archive from the nightlysection. Normally you should use the most up to date release version. Only use the nightly versions if really necessary. Please remember that the nightly builds are done automatically from the actual snapshot of sources, they are not verified, and may not always work.
When downloading Emu68, remember to pick the version matching your actual PiStorm model you are using. On the Emu68 releases you will find three zip files:
Emu68-pistorm.zip- the release for users of classic PiStorm for A500, A600, A1000, or A2000,Emu68-pistorm32lite.zip- the release for users of PiStorm32Lite for A1200,Emu68-raspi.zip- the standalone release.
The standalone release is not for PiStorm users. This is a version which runs without PiStorm and without Amiga - what it does is basically turning your RaspberryPi into a M68k based RaspberryPi.
Once you have downloaded either the Emu68-pistorm.zip or Emu68-pistorm32lite.zip archive file onto your computer, copy the contents of the archive (e.g. via drag and drop) onto the FAT32 partition of the microSD card. The files shown in the screenshot below might be different then those you will see on the SD card - this is normal, as Emu68 is an evolving project the files can change. Do not worry - everything should work as expected, provided you have picked the Emu68 matching your PiStorm model as outlined above.
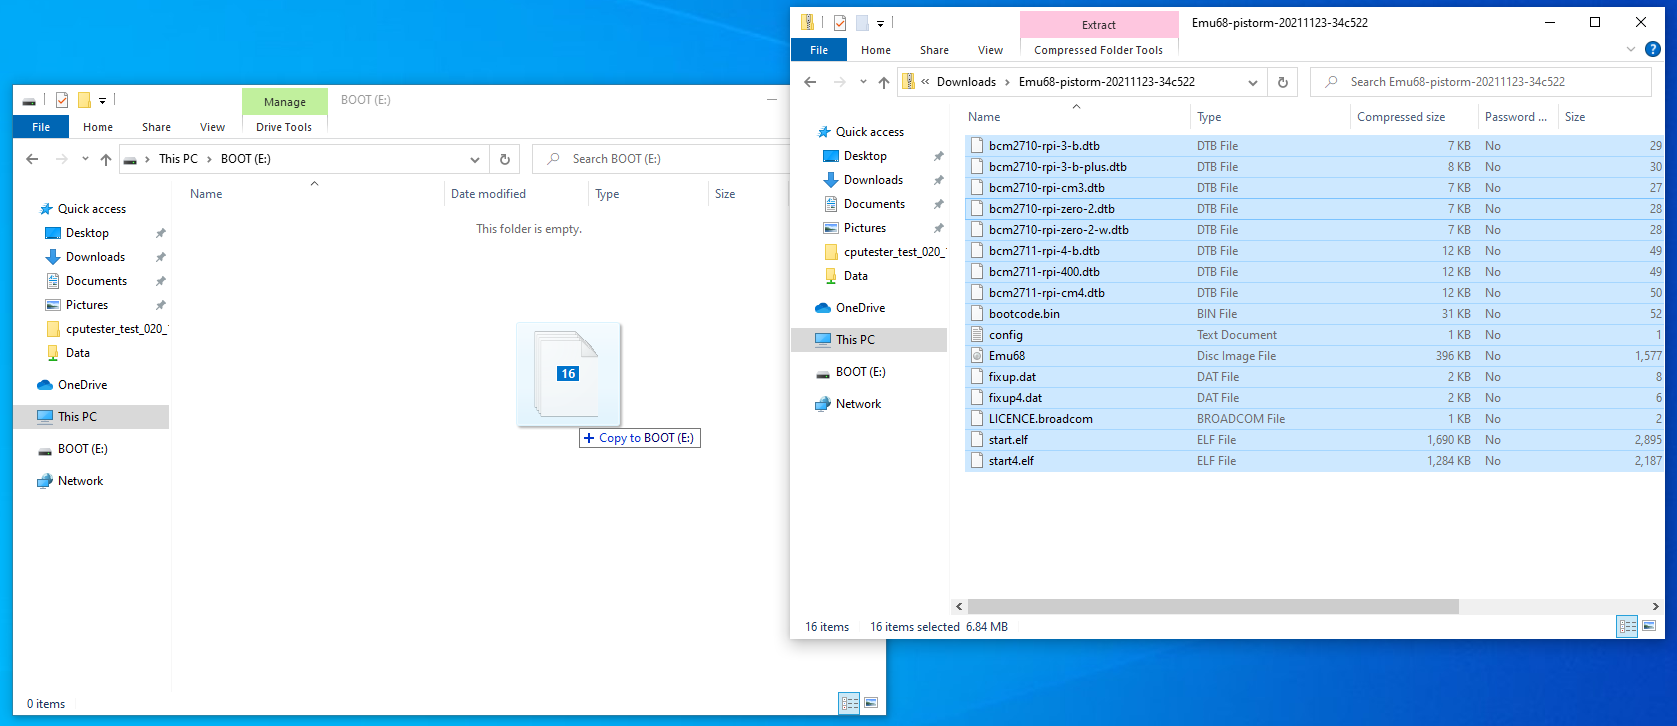
If you are using a maprom-feature of Emu68, which I strongly advise, it is the right time to put your rom file onto the FAT32 partition and add a corresponding entry to the config.txt file. Note, if you are using ROMs from Cloanto’s Amiga Forever package, this needs to be an unencrypted ROM annd some editions of this package contain encrypted ROMs! In my case I have just added the line
initramfs kick.rom
at the end of the document. Save the config and safely remove the card. Put it into Raspberry Pi. Now, the fun begins.
Partitioning on AmigaOS
Power your Amiga with Pistorm and freshly prepared SD card on. It should boot immediately and you should see a kickstart boot screen asking you to insert a floppy. Proceed as usually when preparing new hard drive. In my case I have just started Amiga from Install disk of AmigaOs.
Once Workbench pops up you will notice that you do not see your hard drive yet. This is normal. We will prepare it using HDToolBox, so locate it. Before opening the tool, it will be necessary to adjust the tool types, because by default it attempts to work with scsi.device. So, let’s edit it a little
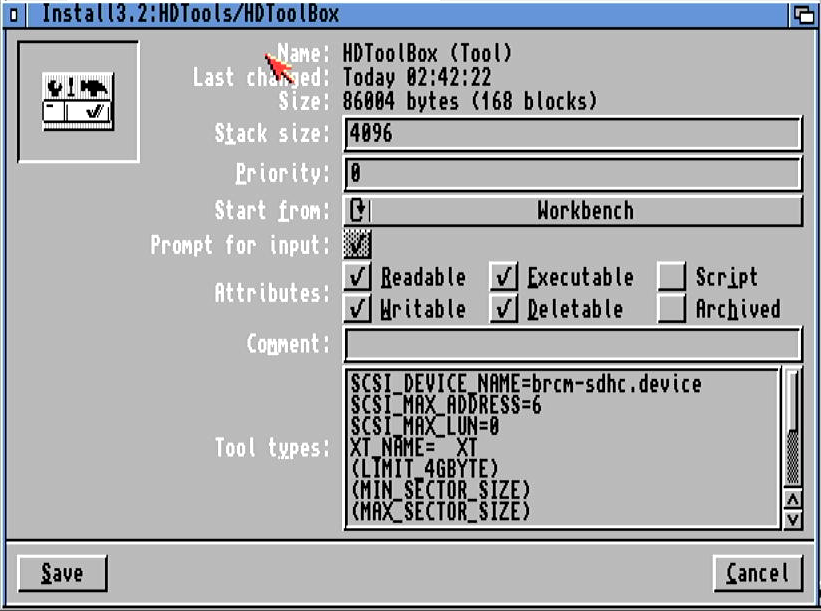
As you may see I have changed the SCSI_DEVICE_NAME so that it points to the Emu68 driver. The driver name to point to will differ depending on the model of RaspberryPi that you are using:
- Pi Zero2, Pi3A+, Pi3B, Pi3B+ should use
brcm-sdhc.device, - Pi 4B+ and CM4 should use
brcm-emmc.device.
If you want to reduce the startup time of HDToolBox, consider reducing the SCSI_MAX_LUN value to 0, as the device driver is not using logical units. This will save HDToolbox searching through non-existent units on start up. Now you may start HDToolBox. It should successfully report two unknown SCSI hard drives at addresses 0 and 1. You have to change the drive type before partitioning can begin, so let’s do it.
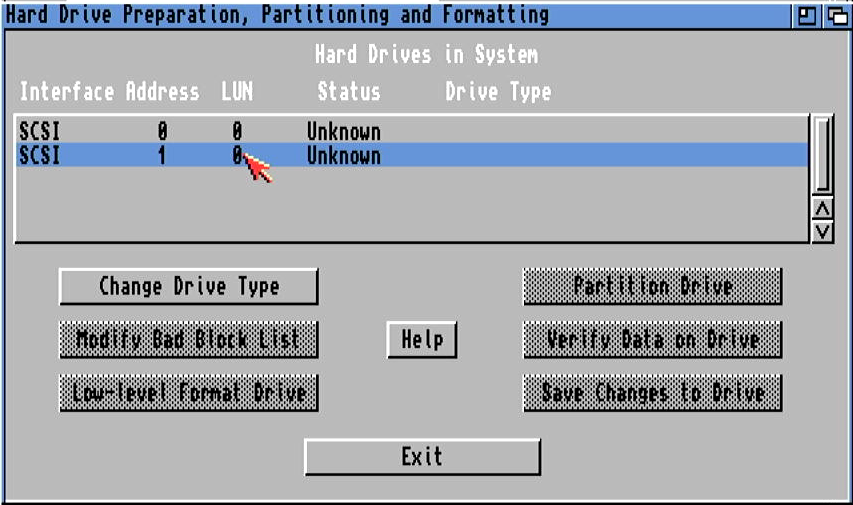
Important!
Please do not change drive type of address 0. Device at this address is your whole microSD card, including the FAT32 boot partition. This device is there for advanced users only (e.g. those who build a hybrid MBR/RDB device layout and/or for those who would like to view and modify contents of the boot partition). Once again, do not change this drive type, unless you really know what you are doing!
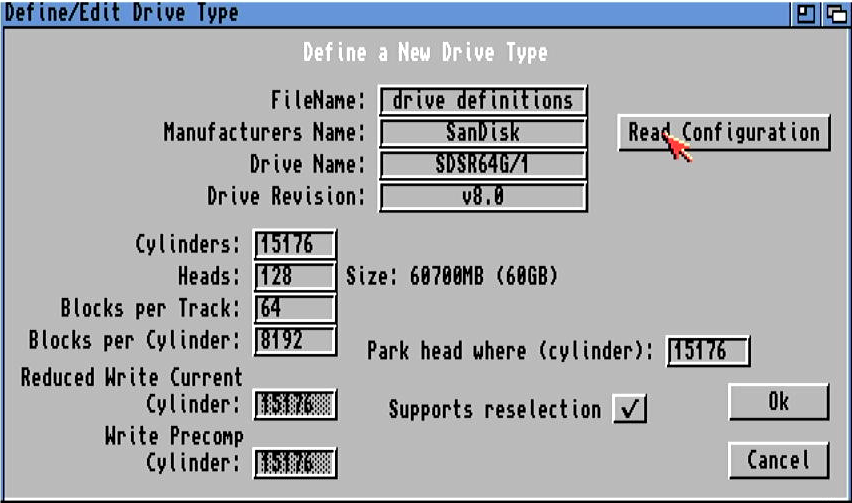
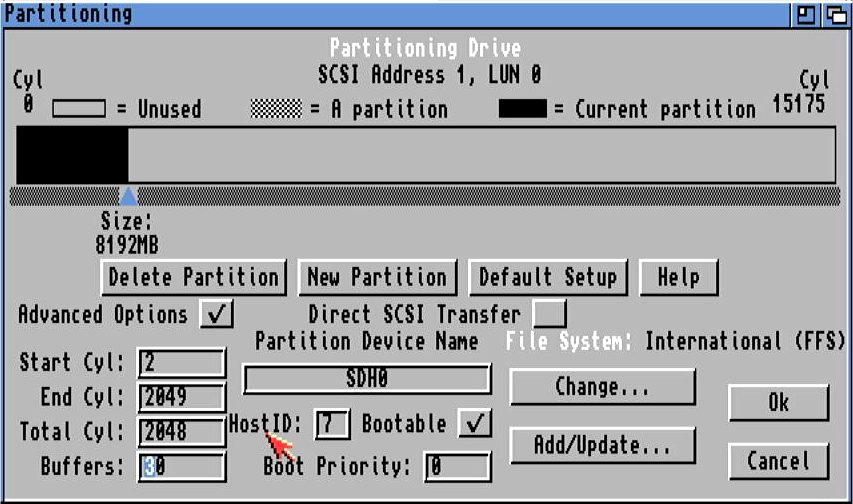
So, let’s select drive at address 1 and click Change Drive Type. A new rather empty window will pop up. Just click there Define New... button. In the subsequent window you will finally be able to read the configuration of the card. Do it, look at it and press Ok.
Now you can continue with partitioning of your drive and adding any special filesystems if you like. Put partitions as you like, set the buffers to a somewhat larger value - we have plenty of RAM so why not use it for something?! Now, if you want to add a new filesystem like I did, press the Add/Update... button.
In the subsequent window you will have an option to add new filesystems to the drive. They will be embedded in the RDB, so you will be able to boot from any parttitions formatted with those filesystems. Press Add New FIlesystem button, select the file (or type it if file select requester is not available for some reason). I have decided to use PFS3aio which I have copied to RAM: previously.
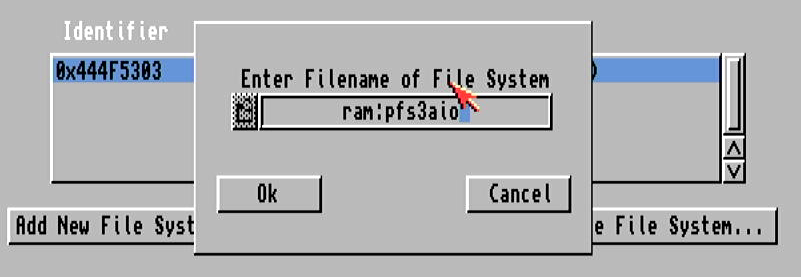
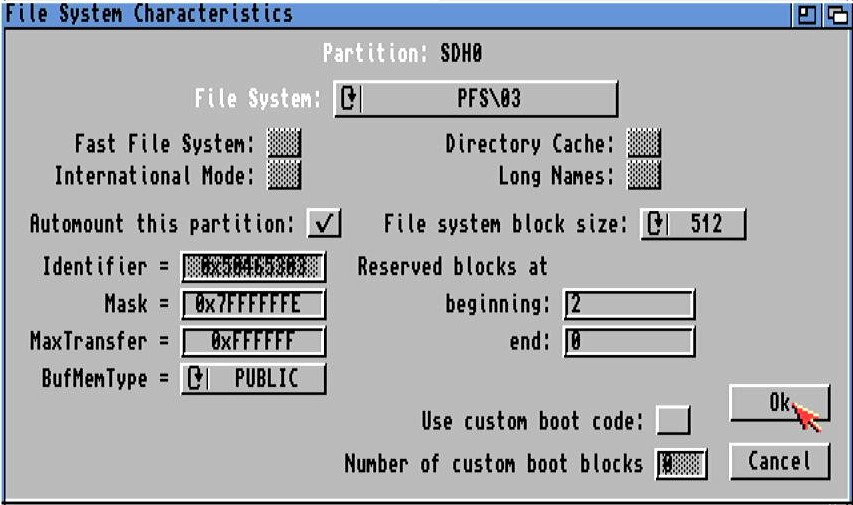
In subsequent requester I have entered the DosType of 0x50465303 and confirmed everything by pressing OK. Now, PFS3 has been added and I was able to select it for partitions I’ve created.
If you are working with PFS3 you need to remember to adjust the Mask field accordingly. The default one suggested by HDToolBox was in my case 0xffffff which tells the filesystem that its buffer should reside within the first 16 megabytes. However, most of Emu68 RAM is beyond that area and PFS3 refuses to work, as it cannot allocate RAM satisfying the mask; the RAM above 16MB is added later, so it will be the first to be allocated for PUBLIC memory type.
Now, after creating all partitions, selecting filesystems, making them bootable etc, you are ready to write all changes to the drive. HDToolBox will tell you that a reboot is required to make the changes active. You do need to do this so follow the direction on the screen.
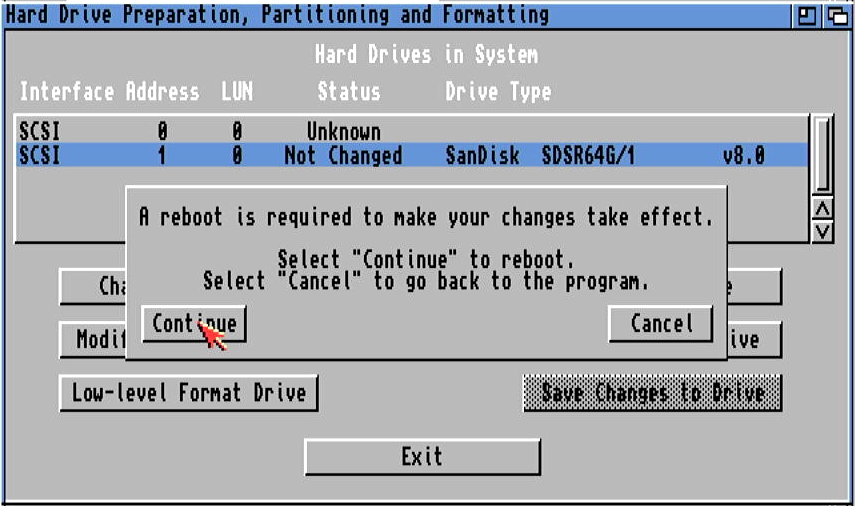
Upon next boot you will see your unformatted drives on the Workbench screen.
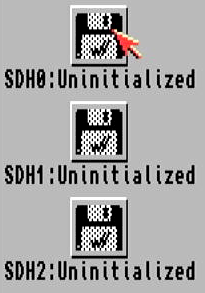
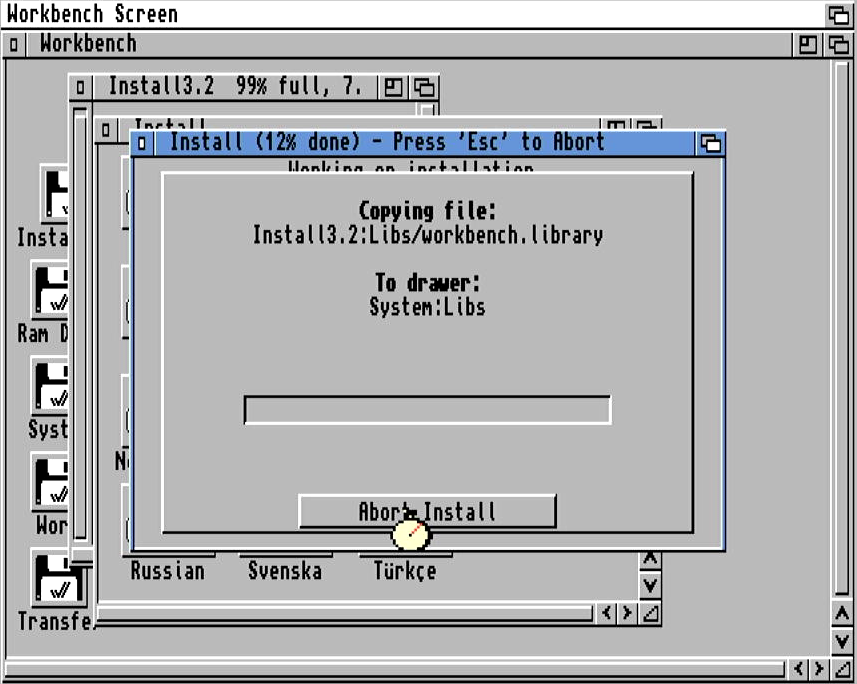
Just format them as you would normally. Once you are done with that, you can proceed with the installation of AmigaOS as you would for any standard Amiga.
And voila! There you are! I wish you happy use of your microSD card with Emu68 :)